The Granny Square is one of the most classic stitches in crochet. It is easy to learn, and it works up quickly. Granny Squares are very versatile, too. You can make them in a variety of colors and sizes, and make many, many different projects with Granny Squares.
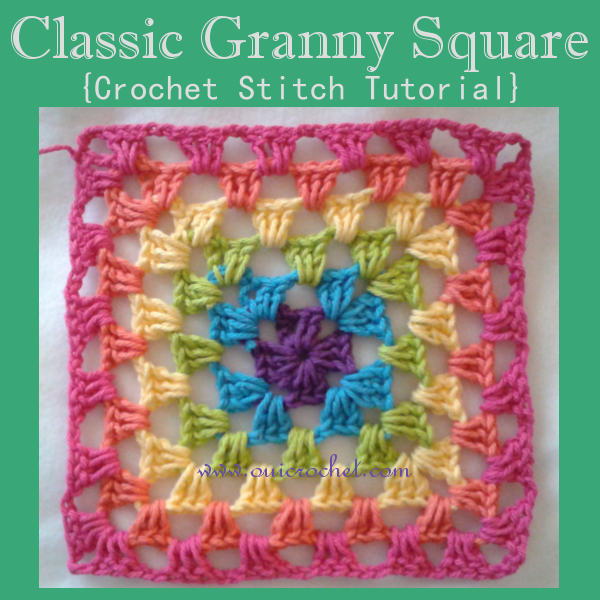
Today, I will break down the Classic Granny Square into a step-by-step, photo tutorial.
The granny square is started in the middle, and worked outward, in rounds. I am using multiple colors, to highlight each round.
I will write the instructions first, then I will break it down for you.
Classic Crochet Granny Square Photo Tutorial
I used a size I crochet hook.
With color A, Ch 4, join with slip stitch to first ch to form a ring.
Round 1: Ch 3 (counts as dc here, and throughout), 2 dc in ring, ch 3, [3 dc in ring, ch 3] three times. Join with slip st to top of beginning ch 3. Finish off. (12 sts)
Round 2: Join color B to the next ch 3 corner. Ch 3, 2 dc in same ch 3 space, ch 2, [(3 dc, ch 3, 3 dc) in the next ch 3 space, ch 2] three times. 3 dc in the same ch 3 space as the first st, ch 3, join with sl stitch to the top of beginning ch 3. Finish off. (24 sts)
Round 3: Join color C to the next ch 3 corner. Ch 3, 2 dc in same ch 3 space, [ch 2, 3 dc in next ch 2 space, ch 2, (3 dc, ch 3, 3 dc) in the next ch 3 corner] three times. Ch 2, 3 dc in next ch 2 space, ch 2, 3 dc in the same ch 3 space as the first st, ch 3, join with sl stitch to the top of beginning ch 3. Finish off. (36 sts)
Round 4: Join color D to the next ch 3 corner. Ch 3, 2 dc in same ch 3 space, [ch 2, 3 dc in each ch 2 space across, ch 2, (3 dc, ch 3, 3 dc) in the next ch 3 corner] three times. Ch 2, 3 dc in each ch 2 space across, ch 2, 3 dc in the same ch 3 space as the first st, ch 3, join with sl stitch to the top of beginning ch 3. Finish off. (48 sts)
Remaining Rounds: You can make as many rounds as you wish. Just continue as round 4.
Weave in all ends.
Let’s go to the step-by-step tutorial:
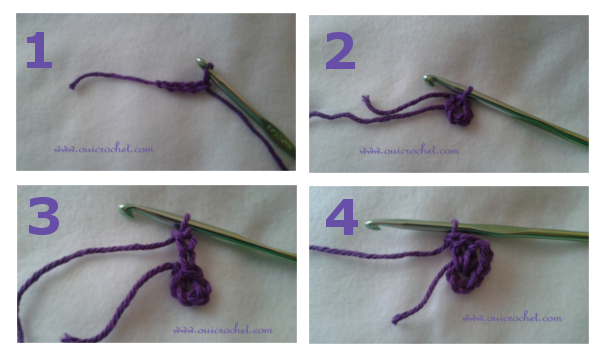
1. With color A, Ch 4,
2. join with slip stitch to first ch to form a ring.
3. Round 1: Ch 3 (counts as dc here, and throughout),
4. 2 dc in ring,
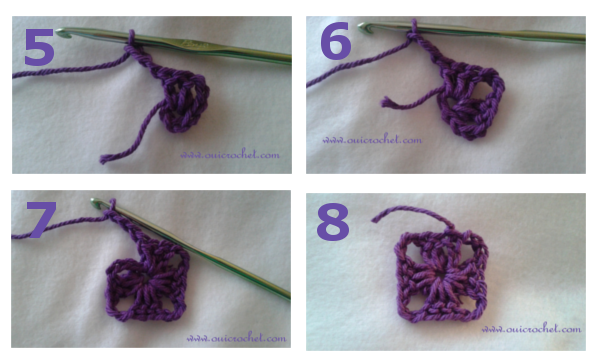
5. ch 3,
6. [3 dc in ring, ch 3]
7. three times.
8. Join with slip st to top of beginning ch 3. Finish off. (12 sts)
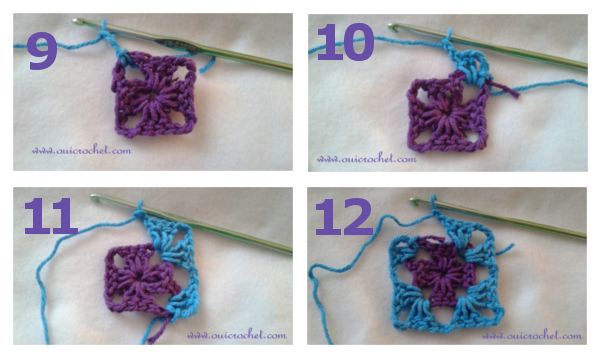
9. Round 2: Join color B to the next ch 3 corner. Ch 3,
10. 2 dc in same ch 3 space, ch 2,
11. [(3 dc, ch 3, 3 dc) in the next ch 3 space, ch 2]
12. three times.

13. 3 dc in the same ch 3 space as the first st, ch 3,
14. join with sl stitch to the top of beginning ch 3. Finish off. (24 sts)
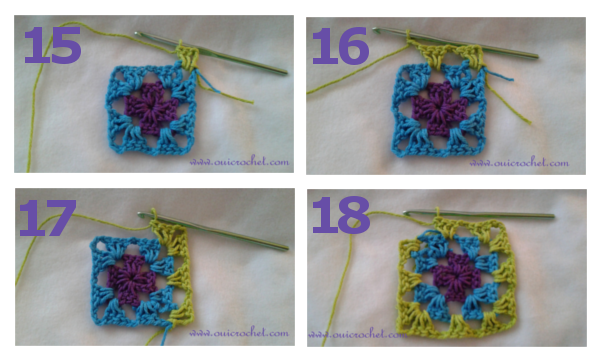
15. Round 3: Join color C to the next ch 3 corner. Ch 3, 2 dc in same ch 3 space,
16. [ch 2, 3 dc in next ch 2 space, ch 2,
17. (3 dc, ch 3, 3 dc) in the next ch 3 corner]
18. three times. Ch 2, 3 dc in next ch 2 space,
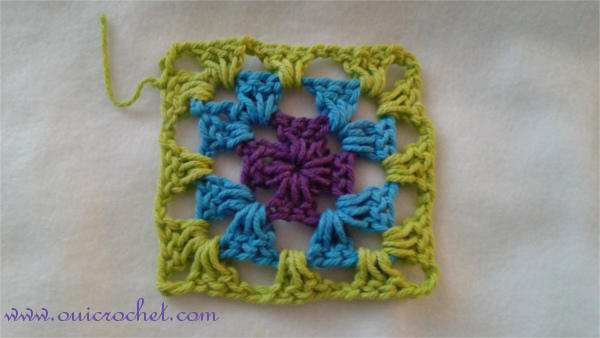
19. ch 2, 3 dc in the same ch 3 space as the first st, ch 3, join with sl stitch to the top of beginning ch 3. Finish off. (36 sts)

20. Round 4: Join color D to the next ch 3 corner. Ch 3, 2 dc in same ch 3 space, [ch 2, 3 dc in each ch 2 space across, ch 2, (3 dc, ch 3, 3 dc) in the next ch 3 corner] 21. three times. Ch 2, 3 dc in each ch 2 space across, ch 2,
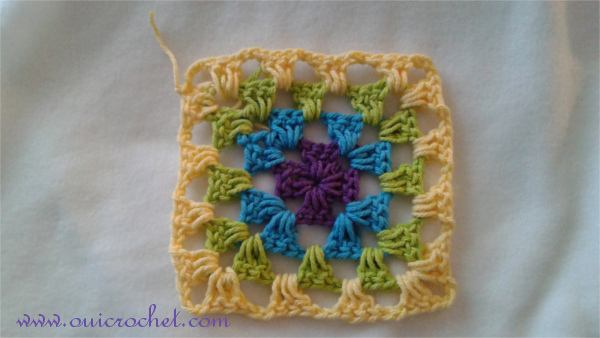
22. 3 dc in the same ch 3 space as the first st, ch 3, join with sl stitch to the top of beginning ch 3. Finish off. (48 sts)
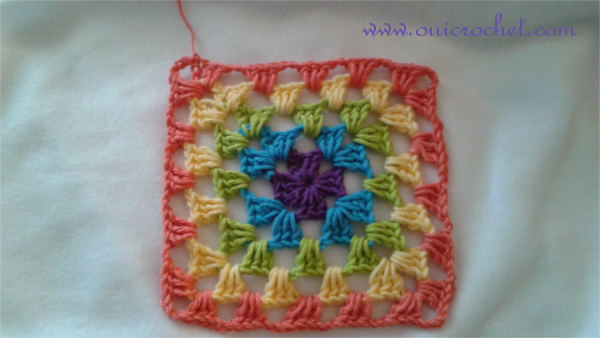
Remaining Rounds: You can make as many rounds as you wish. Just continue as round 4.
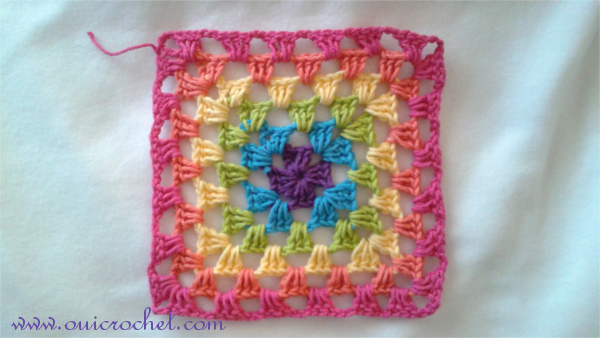
Weave in all ends.
That’s it! Easy, right?
Be sure to come back soon! Over the next week or so, I will show you what I made with my granny squares!
What do you plan to make with the Classic Granny Square?
I love to read your comments, so if you like my tutorial, please let me know.
